
This is a step-by-step guide on how to place your favorite photos or videos (hereinafter referred to as content) on the map to create a location-based augmented reality experience in the ARLOOPA app.
I will show you the opportunity of experiencing this content in AR via a smartphone when you or your friends are in the immediate vicinity of the location where the content is placed.
Sign up here to create an account: https://studio.arloopa.com/en/auth/login

You will receive an email with the account activation link.
See the example below.

After logging in, the STUDIO.ARLOOPA service page will open.
There is a simple sidebar menu on the left, which contains the following sections: User Profile, Map, AR objects, and Log out.
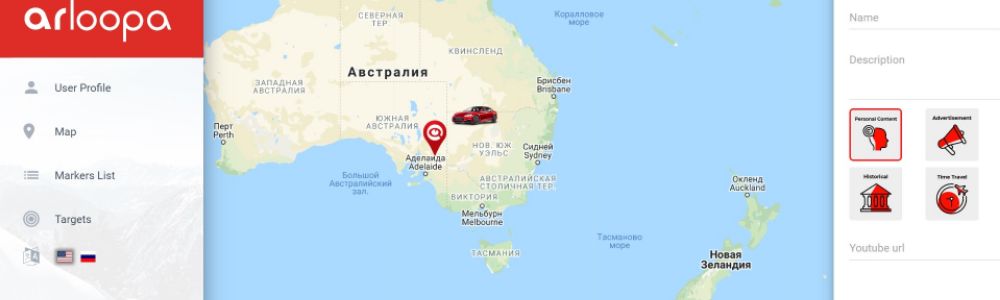
The “Add” button on the map is used to place objects on the ARLOOPA map.
On the right you will see the - and + icons, which allows you to zoom in/out the map to more accurately determine the location where you attach the content.
There is also a search box at the top of the page where you can enter the address or google coordinates of the location where you want to add your content.

A few words about augmented reality objects: we shall call this AR content. The content can be photos, videos (these are 2D objects), audio files, 3D models, animated 3D models, and interactive objects.
Currently, the platform is open for the first three categories of content:
- Photos
- Videos from Youtube (you need a link to the video)
- Audio files
After choosing the location on the map where you want to attach the content, click on the Add button.
A window will appear on the right to enter the data and upload the content.

So, there are three buttons:
VIDEO, AUDIO and IMAGE.
Let’s take a look at each option.
VIDEO
How to fill in the fields:
1) Name - This name will be visible in the application to the user who will launch and experience the augmented reality.
2) Description - this is the description of your content
3) Youtube URL (see the selected video in the screenshot, the URL of which we inserted)
After this window with the fields appears, you will no longer be able to change the location of the future content. When all the fields are completed, click STORE to attach the content.
The pin for your future content is now set. The content will become available only after it is manually moderated by the administrator. After moderation, you will receive an email notifying you that the content is available or rejected (in case of non-compliance with the website rules).

Audio content is added in a similar way.
AUDIO
Fill in the fields:
1) Name - This name will be visible in the application to the user who will launch and experience the augmented reality.
2) Description - The description of your content:
3) Audio file - the difference from VIDEO is that you can upload the necessary audio file from your computer.
When all the fields are filled, click STORE to attach the content.
The pin of the future content, in this case, an audio content is created. The content will become available only after it is manually moderated by the administrator. After moderation, you will receive an email notifying you that the content is available or rejected (in case of non-compliance with the website rules).

An image is added in a similar manner.
IMAGE
Here there are a couple of more fields:
1) Name - this name will be visible in the application to the user who will launch and experience the augmented reality.
2) Description - the description of your content:
3) Image - upload the photo (image) file. See thePushkinsky photo below.
4) Width by meters - the width of the image in meters. Thus, you can set the size of the photo and the photo will appear in the augmented reality experience on ARLOOPA in that same size. In our example - 3.2m.
5) Image vertical position - this is the height above ground level in meters (whole or to the nearest tenth of a meter). This means that you can position the photo at the desired height and it will “hang" at this height in the air. In our example - 3.8m.
When all the fields are completed, click STORE to attach the content.


Thus, we looked through all the 3 cases of placing content on the Map to create augmented reality experiences. Users can experience the content when they are in close proximity to the location where the content has been attached by launching the ARLOOPA app and entering the Map mode.
Sometimes instead of the Add button, we see a red button with a cross at the bottom of the page.
The button takes this form when we try to place additional content without moving the map, i.e. on top of already attached content. Therefore, the system blocks this action - in this case, you need to increase the scale of the map with the + sign and then adding content will become possible and the cross icon will be replaced with the word “Add”.

When you go to the Markers list on the side menu, you will see the list of all the objects you have attached. You can view each of these objects with the OPEN button (the content appears on the map) or delete with the REMOVE button.
Once again, the content becomes available for viewing on the map through the ARLOOPA app only after passing moderation.

Below you can see two types of pins. The green pins indicate that the content has been successfully moderated and is ready to be viewed. The red pins indicate that the content is pending moderation.

Now it's time to go to your smartphone, open the ARLOOPA app and see the result. Open the ARLOOPA app and go to the Maps section on the sidebar menu.
If the ARLOOPA app is not installed on your phone, you can install it by clicking on the smart link (the system itself will determine which market to direct you to based on the operating system of your smartphone).
Click on the desired pin on the map and then on the pop-up inscription.
To determine the surface, you need to slowly shake your smartphone several times from side to side in a horizontal plane.
A volumetric arrow appears in the air showing the content location in your environment. Watch the video below.
Finally, meet the advanced features of the STUDIO.ARLOOPA service - the installation of 3D augmented reality objects using the Map function
We’ve opened a preliminary subscription to additional platform features.
Send a request to be the first to get access to the functionality of placing 3D augmented reality objects on the ARLOOPA map.
For the first 500 users, this feature will be provided for FREE.
So, you better hurry up!


